Nutrition

A Comprehensive Guide to Foundational Gut Health

Beneficial Bacteria balance is essential to healing the gut long-term and sustainably.

Gut Bacteria Balance Background

The cornerstone to healing the gut for the long-term and achieving sustainable health is the Beneficial Bacteria balance. Without enough good bacteria in the gut, the bad/opportunistic bacteria will continue to overgrow.  

Without restoring beneficial bacteria balance, results are never sustainable.

Everyone to a degree has some leakiness, suboptimal gut lining health, gut inflammation and ulcerations that either present health issues or that don’t always present major or obvious symptoms. 

Whenever the gut walls are damaged, there will be allergies and food intolerances, even very unnoticeable or minor.  For the most part, symptoms become tolerated and just part of “normal” life.

In the gut wall, there are special cells called enterocytes that are responsible for absorption, proper digestion, and that keep undigested food molecules out of the bloodstream. For enterocytes to be healthy, there’s a process that happens in the gut called cellular regeneration that requires special nourishment in order to promote and maintain growth in the population of beneficial bacteria.   

It’s the beneficial probiotic bacteria that are essential to bring the gut back to health and maintain optimal wellness.

If the gut flora is damaged (out of balance). The best foods and supplements in the world are not broken down and absorbed.

First Steps to Optimal Gut Health: Assessment.

You don’t necessarily need to spend hundreds or thousands of dollars on functional testing, scopes, probes, and breath testing to know that there is a dysfunction within your gut, intestines, and digestion. 

You don't necessarily need a Doctor to tell you that your bowels are irritated. 

Gut health is both complex and simple, but too often, the basics and foundations are missed.  There are levels to this!

First, take a self-assessment of the situation. 

Top Colon Health Signs and Symptoms

These are all signs and red flags that the colon is not happy and needs support.

  1. Cramping in lower abdominal region

  2. Dark circles under eyes 

  3. Coated tongue or buildup of debris on tongue

  4. Fungus or yeast infections

  5. Stools are not well formed/irritable bowels

  6. Bad breath or strong body odour

  7. Feel worse in mouldy or musty places

  8. Less than one bowel movement per day 

  9. Rate your stools based on the Bristol Stool Chart below

Next Look at Optimal Bowel Transit Time; Are you functionally Constipated? 

Functionally speaking, someone is considered constipated if a day passes without a bowel movement.  However, constipation is a subjective symptom and there are different levels to it; Stools are either too hard, too small, too infrequent, difficult to expel, or feel incomplete.

Objective conventional medical signs of constipation are having fewer than 3-5 stools per week, or 2-3 days without a bowel movement. 

For the majority of people, bowel transit time,  the amount of time it takes for food to travel from the mouth, through the digestive tract, and for waste products to be eliminated through stool, is somewhere between 50 to 100 hours.  

Whereas healthy and optimal transit time is between 8 to 24 hours with 2 to 3 bowel movements per day.  Nevertheless, transit times can vary from individual to individual based on a number of factors related to stress, age, gender, diet, exercise habits, mobility, climate, medications, and other personal circumstances.  

It is important to assess and determine individual results with optimal transit time and daily bowel movement benchmarks.

If bowel transit time is too fast, you won’t digest and absorb nutrients properly;  If it is too slow, you will get backed up, constipated and actually reabsorb toxins through autointoxication that your body is trying to get rid of.

Either situation can cause major problems. 

How to Test Bowel Transit Time

If you don’t have a histamine intolerance issue, take 6 caps or 3 tsp of activated charcoal away from food and other supplements or medications and record how long it takes for the black poop to appear (transit time) and to go completely away (retention time).

Record your findings in a health journal.

Functional Constipation and Why it matters to optimize Optimal Bowel Movement Flow

When constipation reaches conventional medicine, emergency room or even functional levels, it is very serious because the toxins in faecal matter can get reabsorbed causing impaction, fever, nausea, severe pain, mental issues and much more. 

⚠️ This is how the body gets poisoned from the inside (Autointoxication). 

A weak, irritated, and congested large intestine becomes the breeding ground for bacteria, parasites, and decomposing waste material which then can produce toxic and poisonous substances. 

If the colon is not healthy and optimally moving waste through, these toxins can enter the blood stream and head straight to the liver, brain, and other organs. This process is referred to as autointoxication.  A constant exposure to these internal bio-toxins will overtime deteriorate different organ and body systems.

Bio-toxins specifically harm liver cells, consequently impairing the liver's 300 plus functions.

For example, this can cause a reduction in bile secretion (needed for digestion and detoxification) causing additional fermenting and overgrowth of pathogens (parasites, bacteria, virus) further burdening and polluting the blood and lymph.

All organ systems are connected and work together.

Start with the ground work (Level 0)

Applying these 3 free and simple steps consistently will drastically improve digestive health!

1. Drink Water away from meals (30 min before or 1 hr after eating) because excess water dilutes important digestive enzymes and stomach acid that is needed to properly break down food.  Add minerals and/or salts to water for better absorption.

2. Take time to sit down, turn off tech, and CHEW food to a liquid watery paste before swallowing. Digestion starts in the brain, the central nervous system (PNS) state, is responsible for calm, rest, heal, and digest mode. If you are standing up, multi-tasking, reading or talking about negative and stressful topics, these activities send signals from your brain activating the (SNS) sympathetic nervous system state to actually slow or even inhibit digestion so you can run away or fight the proverbial lion or bear

3. Walk after meals (particularly after dinner) and the earlier the dinner the better.  This supports healthy digestion, improves sleep, and helps optimize blood sugar. Walking is a calming activity that reduces stress while gentle movement gets circulation to help bring down blood sugar and triglycerides. Walking also stimulates the digestive juices to break down food and effectively absorb all the nutrients.

These habits may not come natural.  It takes practice.  Health is an ongoing process of tripping up and just picking things back up into rhythm again.

Quick Start Roadmap to Better Colon Health (Level 1)

1. Adequate hydration with minerals/salts.

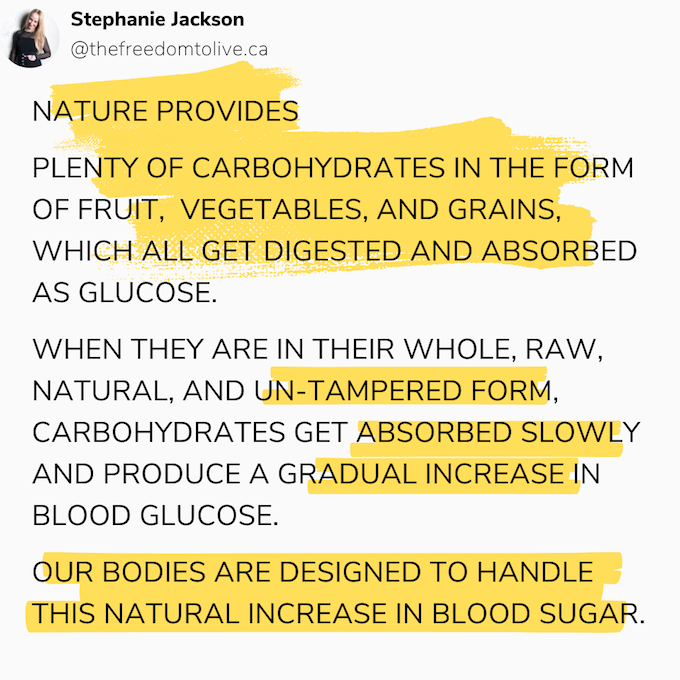
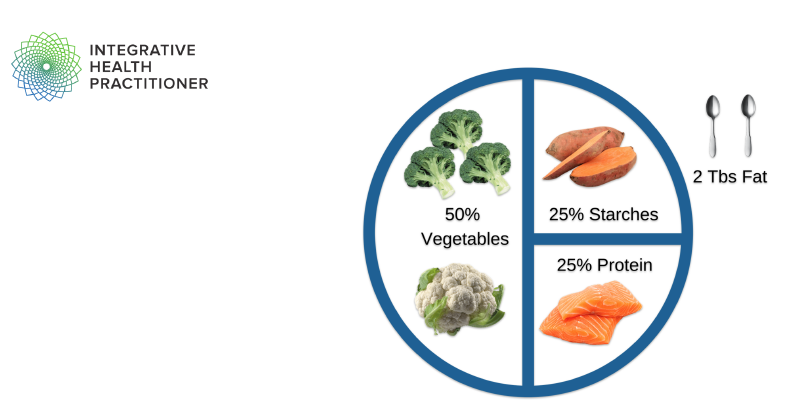
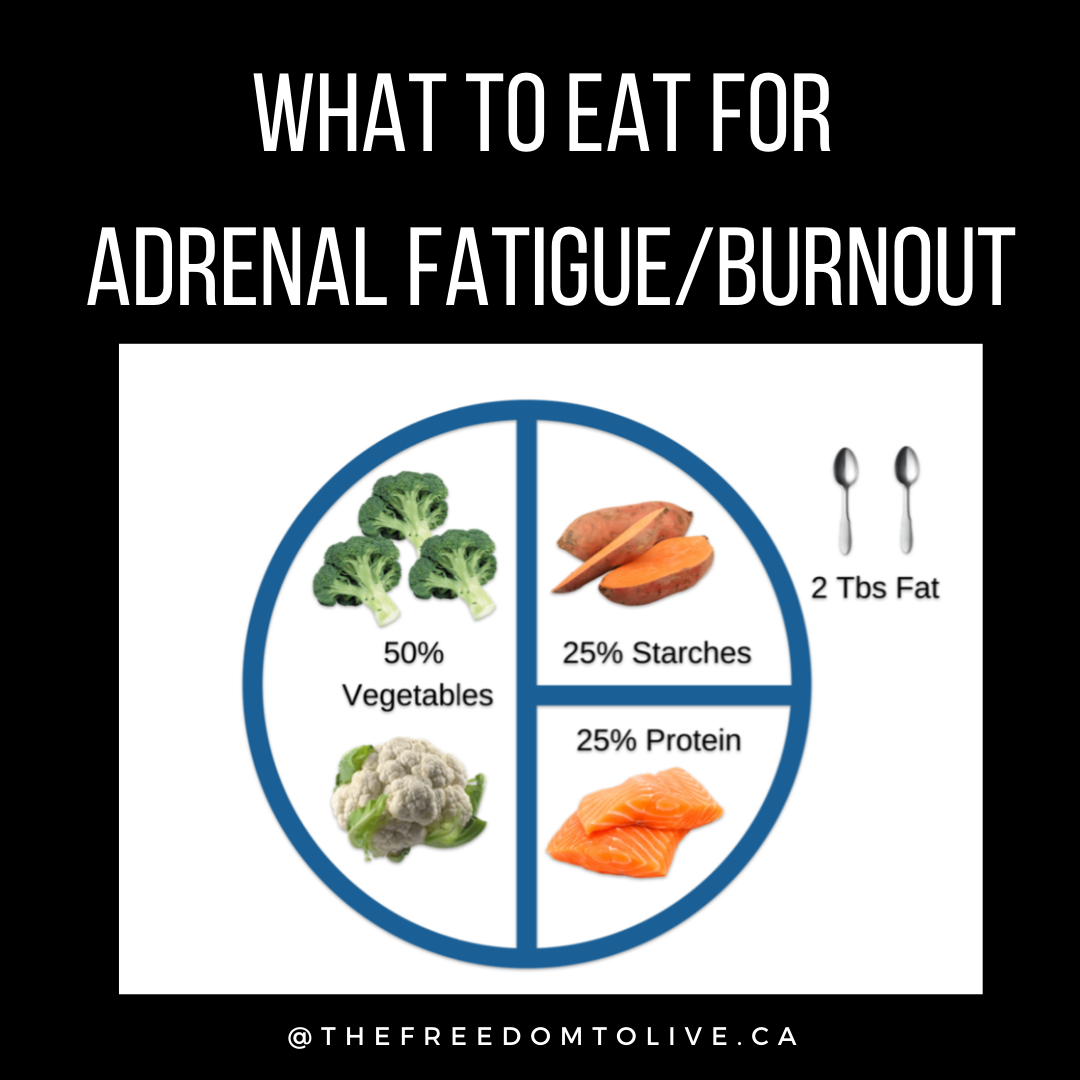
2. Three structured macro balanced meals (healthy carbs, protein, fats). Include the Four Fs (fibres, phenols, ferments, and fats (Omega-3) with every meal. Include a mix of whole food soluble and insoluble fibres with each meal.

3. Eliminate food allergens and sensitivities (start with conventional gluten and dairy)

4. Regulate Sleep-Wake cycle (7-9 hours). Sleep and wake within 30 minutes of the same time everyday.
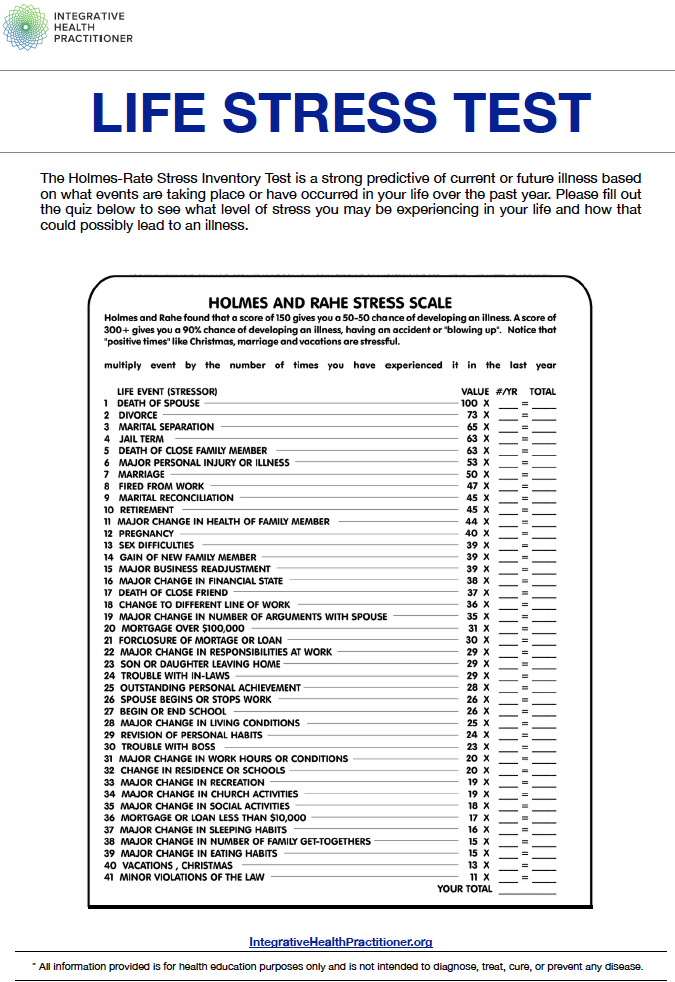
5. Minimize Stress

Foundational supplements for Gut Health

Diving Deeper into Colon Health; Next Steps.

But First. Support Drainage Pathways and Watch for Die-off and Detox Reactions

Even food eliminations, especially refined sugar and processed foods will produce die-off to a degree. 

You may feel better/or worse as the body adjusts. 

When we also start introducing good therapeutic strength probiotics, this can also produce die-off reactions because as we start introducing more beneficial and probiotic bacteria into the digestive system, they start destroying pathogenic bacteria, viruses, and fungi. 

When pathogens die they release toxins. 

You may feel more anxiety, depression, fatigue, tired, just “off”, or develop skin rashes.  These are temporary reactions and usually last for a few days to a few weeks. 

It is important to go very slowly yet constantly and support the body’s drainage pathways.

Doing seasonal Liver Detox Protocols will also significantly benefit digestive health, metabolic balance, and support liver functions which is a cornerstone to optimal gut health. 

For personalized support and a complimentary 1:1 assessment, book here.
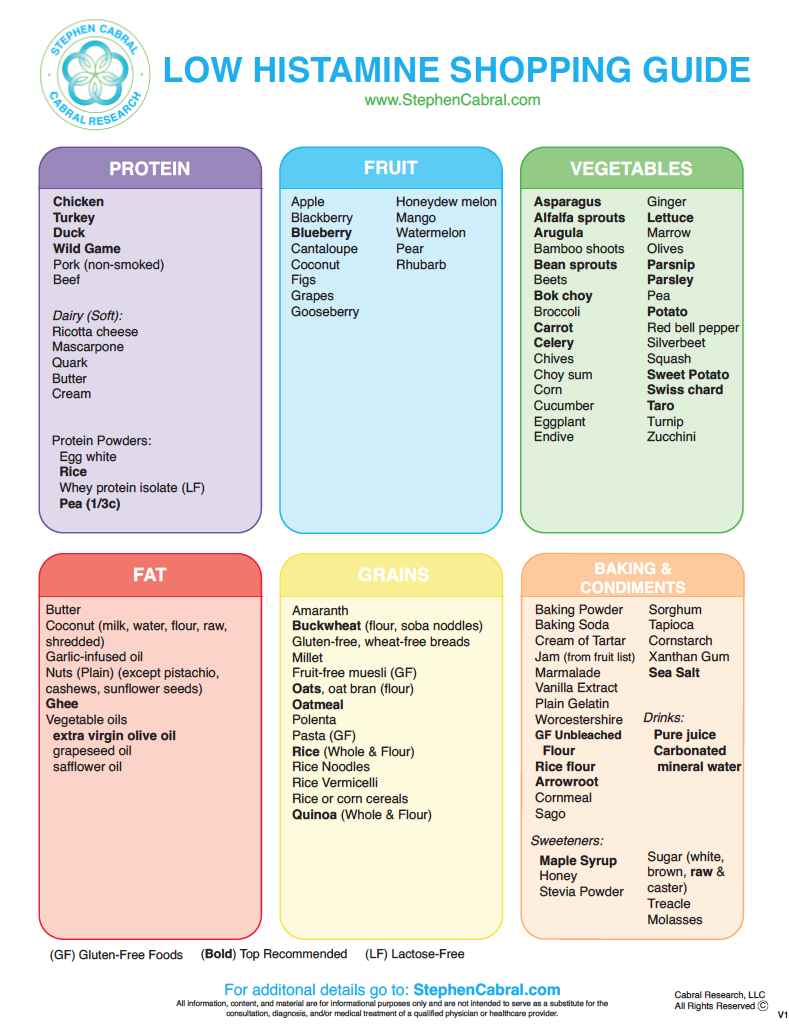
Phase 2

Either Death or Health begins in the Colon, and we can have a lot of control over which one it’s going to be. 

 Personal health care responsibility is required to achieve superior health and wellness; Bottom Line.

Level-ing UP with Enemas and Colon Hydrotherapy

Enemas and Colon Hydrotherapy 

A lot of people in the west find the subject of enemas repulsive and very foreign. Since the 1950s conventional medicine and orthodox medical research has left a once very routine and standard health care practice somewhat fall to the wayside. 

Enemas are one of the oldest and most effective procedures documented in medical history by the Ancient Egyptians and later in various cultures around the world. For centuries, enemas have been a very routine home remedy. 

In the 18th century and early 1900s conventional medicine and medical research widely accepted and understood the importance of colon health, constipation, autointoxication and the practice of colon cleansing. In this era, colon irrigation machines and enema kits were routine and part of standard health care in hospitals and doctor’s offices. 

There continues to be a lot of misunderstanding and unfinished research on autointoxication that began in the early 1900s. 

Russian Nobel Prize 1908 winner, Elie Metchnikoff, father of probiotic research and immunity, stated “Death begins in the colon”. 

He went on to describe the fact that when faecal matter remains in the intestine long enough to putrefy, the products of putrefaction are harmful and are reabsorbed producing poisoning, or autointoxication.  

The term autointoxication is commonly dismissed as quack-science by orthodox medicine, but the concept deserves consideration and attention within integrative medicine. 

Several medical doctors continued to practice and recognized the value and benefits of colon hydrotherapy, the most noteworthy being James A. Wiltsie, M.D.; Joseph Waddington, M.D.; and John Harvey Kellogg, M.D.

Kellogg reported in the 1917 Journal of American Medicine that in the treatment of gastrointestinal disease, in over 40,000 cases, he used surgery in only 20 cases. The rest were helped as a result of cleansing the bowels, diet, and exercise. 

However, in the early 1900s, the widespread lack of know-how and unskilled technicians in advanced colon irrigation did not support the overall advancement and recognition within orthodox medical practice. 

At the same time, many routine and serious illnesses were not successfully treated with this “cure-all” practice and by the 1950s antibiotics and narcotics (strong pain killers) were giving doctors way more mass success at managing pain and providing the immediate ability to treat infectious diseases, for example, tuberculosis. 

So in a way, with the advancement of more modern and orthodox methods, the baby got thrown out with the bath water instead of adopting integrative approaches which include both preventative holistic lifestyle practices and orthodox medical interventions as needed.

WHY its important to resurface the early research on Autointoxication 

To a degree most have what is called faecal compaction with an overspill.

There can be large or even small amounts of old compacted faeces that become stuck or glued to the walls of the large intestines. This old compacted faeces can stay for many months which provide and result in a fertile rotting environment for all sorts of parasites, bacteria, fungi, and viruses that continue to breed, multiply and thrive.

With faecal compaction, any new food eaten seeps through available narrow channels between these compacted masses, so whatever stool comes out is an overspill, which does not empty the bowel completely.

Consequently, If one is continuously releasing parasites after routine cleanses, this right here can be one of the root cause reasons; faecal compaction with an overspill.

This old compacted faeces results in an internal poisoning, autointoxication, because it continuously produces a lot of toxic substances, which in turn get absorbed back into the bloodstream.

This philosophy goes back to the terrain theory of disease. The “terrain theory” argues that if the body is well and balanced, then germs that are a natural part of life and the environment will be dealt with by the body without causing sickness. 

So, it’s not necessarily pathogens that we are exposed to from the external environment like viruses, bacteria, or other contagious infections.

While these things do exist and fill up our toxic burden and infection load, they are not necessarily the root cause of chronic, long-haul, and “mystery” illness.

Signs of Parasites and other Bio-toxins

Enema Benefits

  1. One of the most effective and quick relief of constipation

  2. The most effective way to clear out faecal compaction from the bowel which also greatly reduces the amount of toxins coming from the internal putrefaction and reabsorption to the blood supply (autointoxication). 

  3. The best way to introduce, probiotic bacteria, and other medicinals directly into the bowel

Quick Start Enema Guide

  1. Always start with filtered water (never tap water). 

  2. Always boil water and let cool to body temperature 95.9 F (35.5 C) to 99.5 F (37.5 C) or cooler around 80 F (26.7 C).  **The colder the enema, the more detoxifying it can be, because cool and cold water will stimulate the colon to contract, cramp, and move (initiates peristaltis). 

  3. Add a pinch to 1/8 tsp of mineral salts (Redmond Real, Pink salt, Celtic salt) to water. 

  4. Start with 1 quart/1 litre or as little as 1 cup if the solution is difficult to hold.  Then gradually increase to 1 quart/litre.  The harder the solution is to hold can be indicative of increased amounts of faecal compaction within the bowel.

  5. Other healing herbs can be introduced to water enemas, such as, camomile, dandelion root, Essiac herbs; Slippery Elm, Burdock Root, Sheep Sorrel, Turkey Rhubarb (C blend), as well as, probiotics (open up capsules and dissolve in the water; start with small amounts 1/4 cap and increase gradually).

  6. Clean enema bucket and tube (use glass or stainless steel) with 20-30ml of hydrogen peroxide (3%-6%) and hang to dry with enema tap open. This will sterilize the equipment. Sterilize and wash the nozzle separately.

Enemas are completely safe, provided that it is performed correctly (a common and simple mistake is not letting the water cool down enough to body temperature or lower and thus burning the colon).

If you feel uncomfortable performing an enema yourself at home, look for a trained colonic therapist in your area to do it for you.  

Coffee enemas for liver support

While coffee enemas do help clear out the colon, their purpose if more for liver support and liver detoxification.  Coffee enemas are better in the morning or earlier in the day after a bowel movement.

See Beginner to Advanced Enema Guide here

Colon Hydrotherapy (open and closed systems)

Colon hydrotherapy is the ultimate RESET; It is a safe and effective way to restore balance in the gut.

There are two types of systems and it’s important to know the difference between "open" and "closed" colon hydrotherapy systems. The main difference is in practitioner involvement, the type of tubing used and in what manner the water and waste exit the body.   Both systems will adequately stimulate the colon, soften and soak matter to help release the following:

  1. Old and impacted waste that hasn’t fully eliminated

  2. Mucus buildup from inflammation and processed foods

  3. Undigested food from poor digestion and/or fast eating

  4. Bacteria and toxins from an imbalanced gut microbiome that can be causing bloating, gas, brain fog, or pain

  5. Candida and yeast overgrowth from sugar, stress, medications, and antibiotics

  The colon stretches out to about 5 feet long, so there’s a lot of ground to cover.  Most often, several sessions are needed initially and as maintenance based on the individual to address the above list.

Key differences between open and closed systems

  • Privacy

  • Comfort levels

  • Potential benefits

  • Specific health goals

Closed System

Closed colon hydrotherapy requires a therapist to insert a larger tube, which can be less comfortable but provides a controlled environment with continuous support.   The closed system is a little bit less stimulating and is good for first timers or those who need a bit more support from a practitioner because a therapist is going to be in the room with you to closely monitor and be able to talk you through the process and answer any questions. Patients with a history of abdominal surgeries or those with more sever digestive issues might prefer closed systems for closer monitoring by a therapist.

All the waste flows through a tube, so you can clearly see everything that comes out.  The water pressure is also a lot lower at about 0.5. psi which can allow the therapist to go deeper and fill longer into the colon. A pressurized stream of water is delivered through the attached hose. When the colon is filled & pressure reaches maximum levels the therapist manually drains the colon back through the hose. 

Since closed systems use less pressure and rely on the therapist to fill and release waste through the same tube, there’s less control over natural elimination and more frequent sessions may be required to address build up or impaction.

Open System

Open colon hydrotherapy involves full-privacy with self-insertion of a small tube, and access to control water flow and waste elimination. This method is generally considered more comfortable due to its gentle nature and smaller tube size.  Open systems can allow for a more thorough cleanse since you can control the release of water and waste.

Great for the more seasoned enema and colonic users because the tube fills up the colon at a much higher pressure (2 psi); However this is still within a gentle gravity-fed system and works with your natural capabilities to receive and expel the water.  Gravity-fed water flow in open systems mimics the body’s natural peristalsis.  Since the water pressure is higher, it is more stimulating so typically not able to fill as long.  However, you can fill and release at your own capacity which more in sync with nature.  This method is really good for people who are more on the constipated side and are experiencing more than 1+ days without regular bowel movements, impacted, and/or backed up.  

Closed vs. Open Colon Hydrotherapy Systems

There are pros and cons to both systems and it comes down to personal preference.

The Light at the End of the Tunnel: Maintenance and Up-grades

1.      Build on the whole foods ingredient home.

2.      Introduce new varieties of seasonal vegetables and herbs.  Grow your own or source from trusted growers.

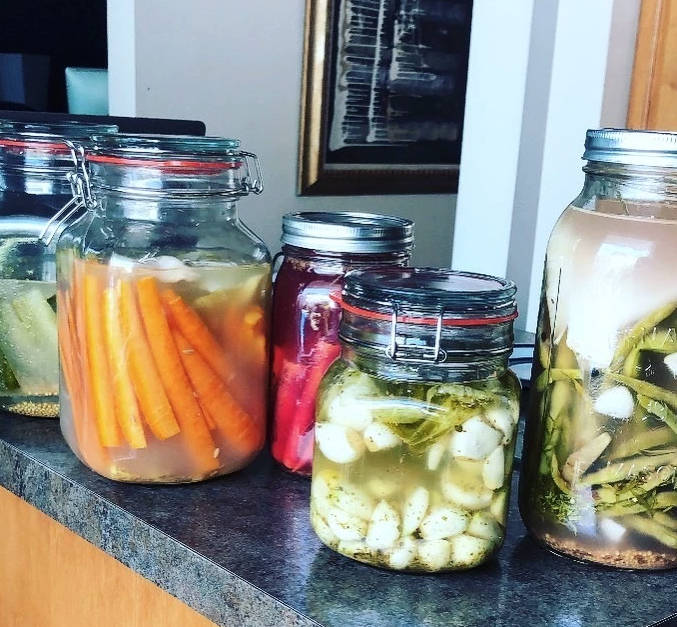
3.      Introduce more fermented dairy and vegetables (home-made).

4.      Source direct (grass-fed meat, raw dairy, beyond organic produce).  This might involve becoming a CSA member and/or herd share member.  Some farms offer direct-to consumer ordering and buying options.

5. Routine Liver Detoxes (seasonal) and Parasite cleanses (late spring or early summer and fall)

6. Routine Enemas and Colonic Hydrotherapy

7. Maintain Foundations (Sleep Schedule, Balanced Blood Sugar, Exercise and Movement Routines).

8. Cultivate and Maintain a Rule of Life (Both Spiritual and Your Body is the Temple Practices^^). *This encompasses the WHOLE lifestyle.  We either START here or END UP here.

A Comprehensive guide to Blood Sugar Balance for Better Gut Health

There are levels to this!

Level 1: Whole Foods and Blood Sugar Balance (3 structured meals daily)

Goals

1.      Organization: Clean up pantry and de-clutter foods in the home and review shopping habits (see Reset Shopping List)

2.      Build a Framework and Structure: Get a meal planner notebook or use printable template pdfs to write out personalized meals from the shopping list on a weekly basis.  Structure and plans provide some freedom and flexibility.

3.      Implement: Aim for 3 structured meals following a low inflammation and low processed-food diet in order to reduce the blood-sugar rollercoaster (highs and lows) and start to balance gut health.

4.      Know your WHY: What is your WHY and motivation? *There needs to be a significant WHY because it does take some discipline and change.  There is also some detoxing and die-off that will happen which doesn’t always feel good.  This is normal as change and healing is happening.

Results

1.      Balanced blood sugar for better energy, hormone balance, and longevity

2.      Improved gut health for better immunity, energy, skin, hair, nails, and longevity

3.      Overall sustainable weight-balance + maintenance

Quick Start Tips

1.      The first step to balancing blood sugar is to aim for 3 meals/day with a 3-4hour window in between meals. Set the goal to maintain 3 structured meals with as much variety as tolerated while healing with adequate sources of whole-food fibre, fat, and protein to balance carbohydrates. Whole food fats, protein, and fibres provide the body with good blood sugar stabilization and keeps inflammation low.  Consequently, this tells your adrenals the environment is safe and makes it more likely you will be able to 1) regulate your period/cycle/hormones and 2) shed excess weight.  Healthy fats fuel healthy hormones and keep inflammation low, they are also required for optimal brain function.

*Start with familiar foods first and watch for bloating and any sensitivity for the first 30 days.  After 6-8 weeks, begin introducing new veggies and fruit.

2.      Eat breakfast within 1-1.5 hours of waking and avoid coffee (caffeine) and/or any moderate/intense workouts on an empty stomach.

3.      Sleep 7-9 hours (ideally asleep before 10:30pm) for melatonin to cortisol balance.  Set a sleep schedule and go to bed/wake within 30-minutes of the same time each day -7 days a week.  i.e.) If your wake time is 6:00am; waking can be as early as 5:30am but not later than 6:30am.  Suggested bed time in this context would be 9:30pm, with a window of 9-10pm.  Sleep scheduling overtime will give you more energy with 7-9 hours of consistent sleep.  Aim to give yourself at least 21 days initially to get into a sleep cycle. 1.      Excess blue/artificial light in the evenings contributes to insulin resistance and glucose levels.  Put phones and computers (screens) to bed at a set time.

4.      Avoid snacks in between meals and avoid eating after dinner. Aim to finish eating dinner by 5:30pm to 7:00pm (about 3-4 hours before sleeping). 

5.      Exercise (smart) with graduated resistance-training methods, avoiding long sedentary states, and HIIT/overtraining. Prioritize walking after meals 15-30 minutes, especially after dinner.

6.    Avoid fasting, going too long between meals especially if LDH is below 140 U/L. Intentional fasting can be supportive. For example, fasting overnight vs. during the day is more conducive to blood sugar balance, because this is when the body is naturally in the PNS (parasympathetic nervous system) state where healing, repair, digesting, detoxing, restoration, and homeostasis (balance) happen.  On the contrary, during the day, our cortisol and adrenaline levels are normally higher and ready to take on the world.  This is the SNS (sympathetic nervous system) state. Prolonged fasting during SNS states (whether intentional or unintentionally skipping meals), only contributes to more adrenaline stress further burdening adrenals, thyroid, reproductive, and women's health overall. 

7.      Track glucose with CGM for 10, 14, or 28 days to unveil personal patterns and insights. 

Blood Sugar Balance Background

The Why

The Parasympathetic Nervous System (PNS) state of the nervous system is responsible for relaxing, digesting, physical restoration and healing which happens in the deep state of sleep, as well as, emotional processing and cognitive development, which happens in the REM, state of sleep. 

Regulating insulin and achieving blood sugar balance is also a process.

The Blood Sugar Roller Coaster

With too much carbohydrate intake, including clean “gluten-free/dairy-free GFDF” or “healthy” cereals, breads, rice, grains, crackers, chips, noodles, bars, condiments, high glycemic fruit and vegetables without adequate protein and fat, blood sugar will spike really high and fast.  Then, blood sugar will drop causing a state of low blood sugar.

In addition, these spikes and crashes cause adrenaline and cortisol imbalances, which create an overall stress response that further promotes and perpetuates various illnesses. 

The bulk of processed/packaged foods are carbohydrates and added sugars, such as: breakfast cereals, crackers, cookies, breads, pastries, pastas, chocolate, sweets, jams, condiments, sauces, sugar, preserved fruit, frozen pre-cooked meals, batter etc. 

There are also a lot of added hidden sugars in these items.

The blood sugar roller coaster is even worse if you start your first meal of the day with high carb and high sugar foods, for example, with breakfast cereal, muffins, pastry, pancakes, toast and jam etc. in the morning which also often leads to a cycle of other quick grab convenience foods, caffeine, or long stretches of fasting throughout the day.  

The Spike followed by The Crash (Blood Sugar Roller Coaster) is very harmful for both adults and children. With the nature of children’s food and habits, most likely, a larger part of their behaviour and silent health issues is the direct result of unstable blood glucose.

Finally, an overlooked important point about processed carbohydrates is their detrimental effect on the gut flora.  Processed carbohydrates feed the opportunistic "bad" pathogenic bacteria and fungi in the gut promoting their growth and proliferation, and in addition make a wonderful glue like environment in the gut for various worms and parasites to take hold and develop. 

Gut health is all about promoting and keeping the good bacteria alive so that the opportunists can't thrive and take over.

Level 1 starts with an approach to daily blood sugar balance, which in turn helps you set up for level 2 which is balancing gut health.

“All these micro creatures produce toxic substances that pass into the bloodstream and literally poison the person.  The more processed carbohydrates with or without gluten, the more toxic he, or she will become presenting autoimmune, autistic, schizophrenic, hyperactive, or other symptoms you will see”. -Gut and Psychology Syndrome, Dr. Natasha Campbell-McBride MD

Blood Sugar Balance Top 10 Tips:

As you can see from the list above, its not always WHAT you're eating, but when and how.  There's a lot of factors that go into blood sugar balance.

If you’ve implemented some of these principles and or need a little bit more prioritized and personal guidance on how best to get started with blood sugar and metabolism balance, please schedule a complimentary discovery call to discuss some options

If you have some recent (within the last six months) blood work completed, please also forward these results to stephanie@thefreedomtolive.ca with a brief outline of your top health concerns. 

Next Levels….

A Comprehensive Guide to Foundational Gut Health

Learn How to make Homemade Apple Vinegar

Learn how to make apple or pear vinegar.

Vinegar is a versatile home staple that can be used in cooking, medicinals, and cleaning.  Also, when you shop in season or grow your own apples, you can really make your grocery spending go a long way. 

Apple cider vinegar, apple vinegar, pear vinegar, or also sometimes called, apple scrap vinegar which uses up any leftover and unusable peels and cores, are all different but similar methods to making vinegar.

It is really important to distinguish the difference between the types of vinegars:

  1. Whole Apple Vinegar

  2. Scrap Apple Vinegar; and

  3. Apple Cider Vinegar.

While the first and second are similar, the difference really is that the first one is made with the whole fruit, and scrap vinegar is made with just the leftover unused peels and cores.Apple cider vinegar is made from the juice of the whole apple.  

Whole apple or apple scrap vinegar tends to have a milder and less acidic taste, which can be more appealing when used in recipes. However, due to its lower acid level, whole apple and apple scrap vinegar is not suitable for canning.  Since you can’t properly test the acidity level of homemade vinegars, this is the reason why it’s not generally recommended for caning recipes.  

Supplies needed

  • 1⁄2 gallon (2 litre) jars.

  • Cloth

  • Rubber bands or string

Ingredients needed to make Apple Vinegar

  • 1 Pound (0.5 kg) cut whole apple, or apple scraps, cores, and peels.  You can use any variety of apples for this recipe, as well as, substitute apples for pears or even a combination of the two.

  • 1/3 Cup (67 g) Sugar. Opt for organic cane, brown, or white sugar.  You can’t use alternative sweetness such as stevia, erythritol, xylitol, monk fruit, etc.

  • ½ Cup (120 ml) Raw Unfiltered Cider Vinegar. Unpasteurized or ACV that has a vinegar mother is necessary because this acts as the “starter liquid” to inoculate your apple scrap vinegar.  Once you have established home-made vinegar, you can use your own for the “starter liquid”.

  • 2 Quarts (2 litres) Filtered Water.  Do not use unfiltered chlorinated tap water. 

How to Make Apple Vinegar

  1. Warm up 1 quart (1litre) of  water, not boiling.   Add to the 1/2 gallon (2litre) jar.

  2. Dissolve 1/3 cup sugar in the warm water.  Stir until dissolved.

  3. Put the fruit into the 1⁄2 gallon (2 liter) jar. 

  4. Add 1/2 cup of the raw vinegar. 

  5. Fill up the rest of the jar with room temperature unfiltered water (about  1 quart/1 litre) covering the fruit up to the neck of the jar.

  6. Stir the sugar, water, and fruit with a wooden spoon at lest once a day for the first 7 days.

  7. Cover with a cloth and secure with a rubber band or string.  You will want some oxygen and air flow to to reach the mixture.

  8. Place on the counter or another spot ideally around 70°F to 80°F (21-26°C).

  9. The ferment will begin to slow down in about two weeks (less bubbles). Now it is time to remove the apples and fruit scraps. You may see a film developing on top when you remove the cover. If so, work carefully to keep it because this film is the beginning of the vinegar mother. You can set the film aside while straining out the fruit solids, then add it back into the vinegar.

  10. Cover it again and let it continue to sit on the shelf.

  11. Check the vinegar in another 2-4 weeks, and you should have nice acidity; however, it may take another month or two to develop fully.

  12. Bottle the vinegar, save the mother for another batch or share with a friend.

  13. You can use the vinegar immediately, or you can age the vinegar to mellow the flavour. 

  14. Apple scrap vinegar will last indefinitely at room temperature.

See my IG Video: Apple Vinegar in the making here!

Did you make this recipe? If so, please leave a comment below and snap a photo tagging us on social media @healthytradititonshomestead and @thefreedomtolive.ca so we can see!

Also see:

Fermenting Foods 101

Scroll to the bottom of this post on a natural approach to cold and flu season for a simple easy Fire Water Recipe using homemade apple vinegar!

5. Foundations: (Food) Seed Cycling for Hormone and Cycle Balance

The HOWs and WHYs of Seed Cycling to balance hormones, acne, and irregular menstruation

Aim to consume 1 tablespoon of ground flaxseed + 1 tablespoon of ground pumpkin seed in the first 7-14 days of your cycle depending on length; or follow the moon cycle if it is really irregular or in the absence of a cycle.

For the second half, consume 1 tablespoon of ground sesame seed + 1 tablespoon of ground sunflower seed.

Seeds can be added to smoothies, salads, or within baking.

Read the full article for the HOWs and WHYs  here:

https://fullscript.com/blog/seed-cycling

4. Foundations: (Food) Quarterly Seasonal 15-Day Integrative Detox

To Support Liver/Gallbladder health, from mild, severe, to maintaining digestive, immune, and liver health consider the 15-day integrative detox and/or the Andreas Moritz Liver and Gallbladder Miracle Cleanse for high cholesterol, inflammation, cardiovascular issues, constipation, headaches, circulation issues, water retention.

Download the Detox! click the image above.

3. Foundations: (Food) Rebalance Moderate to Severe digestive issues and mystery food sensitivities

Eliminating Histamines can help reduce symptoms (bloat, respiratory issues, sinus congestion, allergies, excess phlegm etc.)   

Sometimes even lemon water!!! ( citrus fruits are not themselves considered high in histamine, but can trigger your body to release stored histamine ). Observe if oranges, grapefruit, or any other citrus cause problems.   

Left-overs are another often missed histamine trigger.   Think about any foods that are aged (spices, cheeses, ferments etc.)

Also, many ingredients in processed foods: desserts, conventional baking, preservatives, and additives often trigger histamine reactions.

Gut imbalances, stomach, and digestive issues highly correlate to those who have histamine sensitivities/intolerances.  

Check out these resources by clicking the images in this post.

Download the 30- day Sensitive Gut Guide by clicking this image above.

2. Foundations: (Food) Reset, Get on Track, Balance Blood-Sugar and Weight.

To reset and get back on track with nutrition and weight balance/blood-sugar control, consider the 3-Day reset or the 30-Day clean eating challenge

Click the image to get your copy of the 3-day reset.

30 Days of Clean Eating for the whole family! Click the image below to get the guide.

1. Foundations: (Food) Nutrient-dense hydrating foods over plain water.

Focus on nutrient-dense hydrating foods over plain water (smoothies, soups, juicing) whole foods lifestyle (3 structured meals for weight maintenance).

Swap the SAD breakfast for a smoothie and lunch sandwich for a soup!

This can be an opportunity to add anti-parasitic foods (pumpkin seeds, clove, oregano, cucumber seed) and foods that cleanse the liver (beets, artichoke, dandelion greens).

Herbal tea infusions can also be a medicinal and hydrating choice. (let it steep 15 minutes)


Why Smoothie?

Smoothies provide a very nutrient-dense, hydrating, and easy to digest breakfast.                                                                  

  • 1-2 cup of berries (frozen)

  • 1+ cup of greens (spinach, kale, romaine, arugula, parsley, coriander, collard greens etc.)

  • 10-20g of protein (hemp hearts, hemp protein)

  • 1 TBSP of healthy fat (coconut cream, chia seeds, flax, etc.)

  • 16-20oz of spring water (May use 6 oz unsweetened nut milk (carrageenan, xanthan gum free)

  • Adaptogens and Immune modulators (ashwagandha, reishi, moringa, maca, etc.)

  • Open up vitamin capsules and add in (capsules can be hard on the digestive system and cause build up)

Blend and drink over 60- minutes (can wait to drink until warm if needed for digestion)


Super Smoothie Recipe Guide & Cold-Pressed Green Juice Recipe Guides.

Weight-Balance Plan (3 Macro structured Meals): Breakfast Smoothie; Plant-based/Palio Lunch & Dinner.

Why Soup?

Similar to smoothies, soups provide a nutrient dense, soothing, and an easy-to-digest, yet warming form of nutrition.  Raw foods require a great deal of energy for the body to digest as well as adequate levels of both mechanical and chemical processes.

If the digestive system is not equipped to break down certain foods, even healthy options, like raw salads and uncooked vegetables, these foods can actually become a source of toxicity since they can't be properly broken down.

Get inspired with these 15 healthy soup ideas.

Mix and Match.

Get Creative.

Inspire others with some of your soups that you make and tag us on Instagram @thefreedomtolive.ca

Click this image to download 10 great tasting green juice recipes!

Click the image to download a copy of Super Smoothies! A smoothie a day keeps the doctor away!

Click the Image to get a copy of these amazing soup recipes!

Fermenting Food 101

Fermentation is the ONLY food preservation technique that progressively improves the nutritional value of your food making it healthier for you as it ages.

It’s also really HARD to MESS it UP and there’s a TON of room for creativity while following some basic principles.

Unlike other food preservation techniques, freezing, drying, and canning, with each of these processes, we are loosing some of the nutritional value.

Unlike Canning which is an unnatural and industrialized way of preserving foods within the last 200 years; Fermenting is a many thousand-year-old process done for centuries that allows the natural bacteria present in food, in air, and on your kitchen surfaces to proliferate to allow these very bacteria to preserve the food.

In this modern industrial age, we've really become so disconnected with our food and we've even become almost afraid of it.  Bacteria is our friend and not our enemy.  In both the conventional and holistic space, we are often being taught to kill and fear bacteria.  It's all about a healthy level of balanced bacteria that mimics nature.  When we annihilate and wipe out all the bacteria unnaturally, that scenario is when we typically see an imbalance of the bad to good ratio.

Fermenting vegetables is very, very safe. There is no hidden dangers involved. If something goes wrong with your ferment, you are going know immediately when you open that jar or open that crock up, because it's going to smell so bad.

Unlike pressure-canning low-acid foods where it’s more important to follow tried and tested recipes to a T, you can put away your cookbooks and make up your own recipes and they're going to be completely safe and amazing. 

KEY PRINCIPLES

1. Choose raw, fresh, and organic vegetables

If your vegetables have been sprayed by fungicides, pesticides, or herbicides, you're very likely to kill off the good bacteria that you want to grow, and you'll end up with rotten food rather than fermented food.

2. Water

Likewise if you are using unfiltered tap water containing chlorine, fluoride, pesticides, and chemical fertilizers etc. this is counterproductive and will kill off the good bacteria.

3. Salt Brine

Do not use iodized salt or table salt, as both of those things contain 

chemicals that can harm your ferment. You can use a 100%-pure sea salt,  Himalayan salt, a Celtic salt, Redmond Real Salt etc.

Getting Started

The easiest way to eat a ferment is just as a cold side dish all by itself, but there are so many other options. Of course, to retain most of its healthy properties you will want to eat it raw and not heated above about 105°F. But that doesn’t mean that you CAN’T cook it.

It is suggested that one should eat 1⁄4 cup of raw fermented food per meal for optimal health. You can do this by eating a ferment plain or by adding it to warmed food right before serving. Adding fermented veggies to a bowl of rice and chicken makes an amazing, simple meal.

Making A Brined Ferment

Cucumbers, Carrots, Garlic, String Beans, Beets, Red Onions, Bell Peppers, Broccoli, Ginger Root, Fennel, Celery, Cabbage,

Any vegetables that are whole or chopped will need to be submerged in a brine. Making brine is very simple; it is just salt and water combined and stirred until the salt dissolves. A great thing about brine is that you can prepare a large amount at once and just save it in the refrigerator until it is needed. That makes chopped veggie ferments REALLY simple. Harvest the veggies, chop them, stick them in a jar, pour in the brine, submerge the veggies, and you are done! Now that’s my kind of food preservation.

Basic Brine (Chopped or whole veggies):

  • 1 quart filtered/distilled non-chlorinated/fluoridated water

  • 3 tablespoons fine grained salt (4.5 tablespoons if using coarse salt)

  • Mix together until salt has dissolved.

  • Add 1/4 cup of starter (either kombucha or left-over brine from a previous ferment). *** If you don’t have a starter then you can double the salt, but this will impact the flavour and most likely be too salty.

    **** I recommend getting a bottle of kombucha and then going forward make sure to save your brines for future starter liquid :)

    Each brine will have take on it’s own flavour so have fun with it!

Step 1:

Harvest veggies. You can grab all of one thing, craft a special selection of favourites, or just grab a little of everything that happens to be ripe that day.

Step 2:

Rinse produce to remove dust. Chop to roughly the same size, if desired.

Step 3:
Put veggies in vessel along with any seasoning you desire. 

Step 4:

Pour starter and brine into the jar until all of the veggies are covered by at least 1” of brine.

Step 5:

Submerge veggies under the brine by using a cabbage leaf, a weighted plate, or a fermenting weight.

Step 6:

Leave on counter at room temperature for 3 days. Begin tasting and transfer to cold storage once the flavour suits you (and before it gets too sour). Once you like it, go ahead and put it in the refrigerator or in your cold storage.                                                                     

Storing Fermented Foods

Fermented food really does not go bad as long as it stays under its brine. 

It is important to remember about storing your ferments is that putting your ferments into cold storage does not stop the fermentation; it just slows it way down. 

The closer to the level of freezing you get, the slower that fermentation is going to go. In other words, the colder you can get that without actually freezing it, the longer it's going to take for your food to really break down. The longer you allow the fermentation process, in warmer environments, the more sour your food will become which all means that the colder you keep it, the longer you'll be able to enjoy it.

55: 5 Steps to Rebalancing your Gut Health

Gut health is at the centre of human health and it’s no wonder that the gastrointestinal system is often referenced as our second brain and the body’s first line of defence against illness.  To get well, lose weight, or fix digestion, often it’s about looking deeper at healing your gut where the hidden underlying root causes of imbalance typically reside. Until you fix your gut, your immune system specifically takes the biggest hit. A condition called leaky gut happens when the lining of the gut walls becomes compromised overtime, the gut flora is imbalanced, and proteins from foods spill over into the bloodstream acting as foreign objects. All triggering the immune system to be reactive.  It is only after rebalancing the mircrobiome and the removal of fungal, bacterial overgrowth, parasites, or pathogens, that you’ll be able to fully reduce inflammation.

The long-term benefits of rebalancing the gut can include:

  • Improved digestion and nutrient absorption

  • Clearer thinking

  • Deeper sleep

  • Vibrant skin

  • Increased Energy

  • Weight Balance

There are several common symptoms of gut dysbiosis, a condition where the bacterial colonies of the gastrointestinal system are out of balance, which is closely associated with several other conditions including: IBS, colitis, candida, celiac disease, leaky gut, PCOS, chronic UTIs, as well as skin conditions such as acne, psoriasis, and eczema.

General symptoms of gut dysfunction often include:

  • Weight gain

  • Diarrhea

  • Fatigue

  • Vaginal or rectal itching

  • Craving for sweets & carbs

  • Bloating

  • Heartburn

  • Mood disorders

  • Difficulty urinating

  • Joint pain

  • Hormone imbalance

  • Gas

  • Bad breath

  • Anxiety

  • Brain fog

  • Low libido

  • Muscle weakness

  • Constipation

  • Headaches

  • Depression

  • Lack of concentration

  • Chronic allergies

  • Sinus congestion

Step #1 to rebalancing the gut: don’t guess, test

One of the best courses of action, and the first places to start is with a wellness blood panel . This is truly the prerequisite step in order to have an overview of your health. Looking at bloodwork from an optimal functional perspective allows a great window into your gut health uncovering key deficiencies and early red flags. In addition there are some benefits to also looking at other functional medical lab testing.  It is the only way to really know what imbalances you are dealing with in the gut and to start building a holistic plan back to health.  Functional GI testing can uncover abnormal levels of bacteria such as small intestinal bacterial overgrowth (SIBO), candida, yeast, fungal overgrowth, H. Pylori, or other pathogens and parasites often associated with gut permeability problems.

It can take years of trials and errors and what I like to call, holistic Band-Aids such as, turmeric, frankincense, green tea powder, all in the attempt to reduce symptoms of inflammation; However, a nutritional and herbal plan alone is often not enough to get your gut back to a state of healthy balance.

Once you get the results back from the lab tests, you will then know exactly where you need to start, what you need to remove, and then work on sealing back up the gut walls.

More information: Blood Chem Panels + Functional Medicine Lab Service

Screen+Shot+2019-10-17+at+8.12.44+PM.jpg

Step #2 to rebalancing the gut: remove foods that harm and proceed with an appropriate yeast, bacterial, fungal, or parasite protocol 

There are certain foods in the list below that aren’t ideal for gut health which can feed unhealthy levels of overgrowth and pathogens.

Foods to Avoid

  • Excessive amounts of saturated animal fats, high-fat foods, trans fats, hydrogenated fats

  • Fried foods

  • Dairy

  • Food dyes

  • Condiments and sauces

  • Wheat and Gluten grains (barley, kamut, rye, spelt)

  • Yeast-raised baked goods

  • Alcohol

  • Artificial additives and preservatives

  • Processed nuts

  • Carbonated beverages

  • Processed and smoked meats

  • Packaged and processed foods

Once you have your lab test results, you can work on removing the overgrowth and rebalancing the gut microbiome through a specific protocol such as a candida bacteria overgrowth CBO, SIBO, H. Pylori, or other parasite protocol.  These protocols work to specifically remove the biofilm and access the actual yeast, bacterial, or parasite overgrowth.  Otherwise, it is very difficult with herbal remedies or nutritional support alone to fully remove the imbalance.   Eating well can temporarily help, but often a relapse will occur since it isn’t strong enough to sustainably kill the unwanted pathogens to healthy levels.

Lab tests can also uncover other levels of toxicity such as heavy metals or mould, as well as, vitamin and mineral deficiencies.  From here, it is easier to come up with a personalized and timely plan to rebalance health through nutrition, replenish deficiencies, and remove toxins in the body.

Once you have rebalanced the gut, and sealed up the gut walls, you may find that you have less food sensitivities and that you can go back to eating a healthy balanced variety of foods.  Once you have completed your protocols, you can try reintroducing healthy foods one-by-one over a 3-day windows to observe how your body reacts.

Other Foods that May Need to be Temporarily Eliminated

  • Gluten-free grains (oats, rice, quinoa, amaranth, millet, buckwheat)

  • Nightshades; eggplants, peppers, potatoes, tomatoes

  • Nuts and seeds (except hemp)

  • High-lectin foods: beans, peas, lentils, peanuts, squash

  • Bananas and high glycemic fruit: watermelon, mangos, papaya, pineapple

  • Soy

  • Corn

  • Histamine foods: fermented foods, fermented vegetables, kombucha

Reset your Gut by implementing the 3 Day RESET guide and continue implementing it for 4-6 weeks for best results.

Screen+Shot+2019-10-17+at+10.50.25+PM.jpg

Step #3 to rebalancing the gut: include easy to-digest foods that heal

It takes a very strong and healthy digestive system to thrive on a raw plant based-diet.  Therefore until the gut is rebalanced, it can be beneficial to heat, blend, and stew to help breakdown nutrients so that they are more accessible, easier to digest, and assimilate. Since 30% of our energy is used to digest and breakdown foods, opting for a breakfast smoothie is one of the best ways to get in a good portion of the daily fruit and vegetable servings while reserving energy for heavier protein meals later on in the day.

When sourcing foods to rebalance the gut, it is really important to alleviate the toxic burden on the body while replenishing nutritional deficiencies by:

  • Choosing organic, non-GMO varieties of produce and foods whenever possible;

  • Opting for sustainable animal proteins such as grass-fed, pastured meat and wild caught, low mercury fish;

  • Eating a rainbow of 7-9 servings of vegetables/day (60-70% vegetables and 2-4 servings of fruit/day (lower fructose and lower glycemic options);

  • Consuming lower amounts of overall protein, about 10-15%; and

  • Restricting fat to 10-20% of healthy options such as: avocado, coconut, extra-virgin, first cold pressed olive oil.

Try some Gut Healing Nutrient Dense Recipes from my SOUP GUIDE: 15 healthy ideas!

Screen Shot 2019-10-17 at 10.50.28 PM.png

Step #4 to rebalancing the gut: reduce emotional, psychological, physical stress 

The gastrointestinal system is especially sensitive to stress.  The fight or flight response specifically diverts energy to deal with whatever the source of incoming stress may be.  This is a survival mechanism that shifts energy away from digestion to instead deal with the perceived immediate danger, either fight or run away fast. Consequently, the digestive processes shut down which shows up as lower levels of digestive enzymes and stomach acids required to breakdown food, as well as less saliva production.  This can result in stagnation, issues related to nutrient absorption, slow or hyperactive bowel activity, and hormone dysfunction.

Balancing daily routines and exercise with more calming YIN styles, or parasympathetic nervous system activities can help soothe and restore the digestive function. Here are some examples that can greatly improve the body’s ability to move into more of a rest, restore, and digest state:

  • Prayer

  • Breath work

  • Meditation

  • Soft martial arts

  • Nature walks

  • Massage

  • Stretching

  • Low-impact exercise

Screen+Shot+2019-10-17+at+10.50.31+PM.jpg

Step #5 to rebalancing the gut: supplement with nutrients that rebuild overall health

Very often it is still not enough to have a healthy routine of nutrition, exercise, sleep, and de-stressing even after completing one of the gut balancing protocols. The last element to the equation is to give the body a boost in terms of nutrients in order to continue healing, regenerating, and ultimately living in more of a thriving rather than surviving state.

Due to the accumulation over the years of toxic foods, substances, overuse of antibiotics, various stressors, nutritional sensitivities, and deficiencies, imbalances within the GI tract can worsen and reoccur.  Sometimes it can take years to feel balanced from this kind of damage unless given a boost with nutrients from whole foods and specific nutritional supplements.

A good foundational support may include:

  • A daily activated multi-vitamin and mineral support

  • Plant-based phytonutrients, antioxidants, and fiber

  • Probiotics

  • Vitamin D3-K

  • OMEGA3

  • A Digestive enzyme support

Book a free consultation to learn how to get started on rebalancing your gut health, get back the life, health, and body you want, book a free call with me here today!

51: Natural approaches to Cold and Flu Season

51 A natural Approach to the Cold and Flu Season.png

Being healthy and living a long healthy and happy life is first and foremost a lifestyle.   


Maintaining a healthy immune system is the primary way of protecting against an excessive number of colds. If you catch more than one or two colds a year, you may have a weak immune system. To strengthen the immune system, I will be sharing some of the foundational recommendations here today.
 

A Naturopathic cure has three main components:

1. The elimination of evil habits such as overeating, consuming alcoholic drinks, drugs, coffee, or meat, excessive worry, etc.

2. Corrective habits to regain health including proper breathing, exercise, relaxation, positive mental attitude, in the pursuit of health and wellness.

3. New principles of living which includes the proper selection of food and natural therapies.

The Freedom to Live 5 things Friday 


Every Friday, 5 things of value from the integrative health sciences.
The best of the best functional medicine, educational resources, research, quotes, books, tips, advice etc. all from the key pillars of the integrative health system.

1. HOW and WHY alcohol impacts our immune system?

Alcohol dependence (in moderation or over consumption) is probably one of the most serious health problems facing society today. Alcohol:

  • Overloads the detoxification processes, contributes to liver damage, and immune suppression

  • Produces chemical stress on the body

  • Increases oxidative stress because it contributes to the depletion of critical antioxidant glutathione. 

  • Increases adrenal hormone output

  • Interferes with normal brain chemistry and normal sleep cycles. 

  • Contributes to nutritional deficiencies: B6, B vitamins, Selenium, glutathione, Zinc, Vitamin A, Antioxidants, imbalanced Amino Acids, Vitamin C, Magnesium

  • Impacts Gut health: the intestinal microflora is severely deranged in moderate to heavy alcohol consumption.

  • Contributes to Hypoglycaemia (disregulated blood sugar) 

Alcohol is often used as an unhealthy calming effect (a Maladaptive coping mechanism) to deal with stress.   

If you want to have a healthy liver, there are three things you definitely want to stay away from: 

Saturated fats, refined sugar, and alcohol. 

Consider following the 3-day Reset as a template which is  designed to stabilize blood sugar, provide a lot of whole food nutrient dense foods that help support your liver, digestion, and ultimately support a healthy functioning immune system. 

2. Love your Lymph: Hydration and Dry Brushing

The lymphatic system, critical to immunity, is a network of tissues and organs that rid the body of toxins, waste, and other unwanted materials; Lymph fluid contains white blood cells that are instrumental in fighting infection all throughout the body.

A healthy lymphatic system is key to a healthy body.

  1. Hydrate: Lymph is about 95% water, making water essential for its health.

Drinking plenty of liquids and using a vaporizer help maintain hydration within the respiratory tract which helps repel viral infection while also improving white blood cells function.

The type of liquids you drink is very important. Studies have shown that consuming concentrated sources of sugars such as glucose, fructose, sucrose, honey, or orange juice greatly reduces the ability of white blood cells to kill bacteria. 

Avoid Caffeine and alcohol, both of which have a diuretic effect. 

 Exercise

First morning exercise such as jump rope or jumping on a small trampoline/rebounder can help get the lymph moving.  There is no pump within the lymphatic system like in the cardio vascular system, so exercise and moving the body is the only way to get it flowing.

3. Dry brushing

Dry brushing helps move the lymph to naturally detox through lymphatic drainage, exfoliate the skin, and clean pores.  In dry brushing, the skin is typically brushed toward the heart, starting at the feet and hands and brushing toward the chest.

3. Sugar

As mentioned above, sugar, even if derived from natural sources such as fruit juices and honey, can impair immune function. 

This impairment appears to be due to the fact that glucose (blood sugar) and vitamin C compete for transport sites into the white blood cells. 

Excessive sugar consumption may decrease vitamin C levels and result in a significant reduction in white blood cell function. 

4.  Antibiotics

More than 90% of all sore throats are caused by viruses. 

• If you have a sore throat, see a physician to rule out strep throat as the cause. 

• Before antibiotics are used, an in-office rapid strep screening test should be performed. 

• If antibiotics are used or have been used, it is important to use a probiotic supplement containing Lactobacillus acidophilus and Bifidobacterium bifidus. 

  • 70% of doctors regularly prescribe an antibiotic for acute bronchitis even though it provides no benefit and significant risk. 

The main risks with overusing Antibiotics include:

  • The overgrowth of Candida albicans 

  • The disruption of normal gut microflora

  • The possibility of developing antibiotic-resistant strains of bacteria. 

5. Key Natural Cold and Flu Supplements + Folk recipes and remedies

Herbal Cold & Flu Protocols to have on hand for acute infections:

At the 1st Sign of a Cold:

  • Rest

  • Stay Warm

  • Drink fluids

  • Eat Well (NO SUGAR)

  • Elderberry Syrup 1 Tsp every 2hrs.

  • Echinacea Tincture 1 tsp every 2hrs. (Discontinue after 2 days)

  • 5 drops of Oregano oil under the tongue

Everyday Foundational General Supplements

  1. Vitamin C (Ascorbates) Buffered Vitamin C

  2. Magnesium Glycinate

  3. B-Complex

  4. Electrolytes: Sodium; Magnesium; Potassium & Trace Mineral Drops

Accute Cold, Flu, and Respiratory Symptom Supplements

**Note these are not to be taken as everyday supplements (only taken to support the onset or beginning stages of symptoms)

  1. Olive Leaf Extract

  2. Goldenseal

  3. Oregano

One of the main treatment goals in bronchitis, sinusitis, and pneumonia is to help the lungs and air passages get rid of the excessive mucus. 

  • Neti Pot

  • Nebulizer

  • Castor oil Pack

  • RLT

  • InfraRed Sauna

  • Magnesium Epsom Salt Warm Bath

  • Mustard Poultice

  1. Apply a heating pad, hot water bottle, or mustard poultice to the chest for up to 20 minutes twice per day. 

  2. A mustard poultice is made by mixing 1 part dry mustard with three parts flour and adding enough water to make a paste (the strength of mustard powder varies greatly, so test a small amount on the skin first to be sure it is not too strong, as indicated by excessive redness). The paste is spread on thin cotton (an old pillowcase works very well) or cheesecloth, and the folded cloth is placed on the chest. Check often, as mustard can cause blisters if left on too long. 

  3. After the hot pack or mustard poultice, perform postural drainage by lying with the top half of the body off the bed, using the forearms as support, for a 5-to 15-minute period while trying to cough and expectorate into a basin or newspaper on the floor.

    Electrolyte Water:

The balance of potassium, magnesium and sodium helps to rehydrate your body on the cellular level keeping you hydrated and best able to battle a virus.

  • 4 c. water

  • 1/2 tsp salt

  • 1/2 tsp baking soda

  • 1 juice of lemon lime

  • 10-15 trace mineral drops

  • 1 tbs elderberry syrup

Mix all ingredients together and drink throughout the day.

To Avoid Secondary Infections:

All of the above plus:

Fire Water—1 Tbs (recipe below) every 2 hrs. or as often as needed

Buy or Make Elderberry Syrup Recipe:

  • 1 cup fresh or frozen elderberries de-stemmed (or 1/3 cup dried)

  • 1-2 cinnamon sticks (optional)

  • 5 whole cloves (optional)

  • 2 Tbs. fresh, grated ginger (optional)

  • 2 cups water

  • 1 cup honey

  • 2 Tbs. lemon juice (optional) (necessary if canning)

  • Simmer elderberries and spices (if using) in water for about 20 minutes, mashing slightly.

  • Stir in honey until completely dissolved.

  • Store in the refrigerator until it molds or process in a boiling water bath canner for 10 minutes (adjust for altitude) to store on shelf.

Each pint contains about 92 1 tsp. servings.

Dosing:

Take 1 tsp every day to strengthen your immune system.

Take 1 tsp every 30 minutes to 2 hours at first sign of a virus.

*Note* To make a honey-free version that is safe for babies you can replace the honey with rice syrup.

Fire Water:

  • 1/2 cup garlic cloves, whole and unpeeled

  • 1/2 cup whole dried or fresh cayenne or 1/8 cup red pepper flakes

  • 1 qt raw apple cider vinegar

  • Put herbs in jar

  • Pour ACV over herbs, stir in until all herbs are wet

  • Cover with plastic lid

  • Steep for 4-6 weeks, shaking daily for the 1st week

  • Strain off herbs

  • Store in cool, dark place

Vinegar tinctures will last for at least 1 year when stored in a cool, dark location.

Dosing:

Take 1/2 oz (1 Tb.) every 30 minutes - 2 hr. to avoid any secondary infections or anytime you would use an antibiotic

Fire Water Oxymel:

  • 1/2 cup Fire Water (see previous recipe)

  • 1/2 cup honey

  • Heat slightly and stir until thoroughly mixed.

  • Cap and store in a cool, dark location. Will store well at least a year.

Dosing:

Take by the tsp as needed to soothe a scratchy throat or a dry tickly cough.

Sage and Salt Gargle:

  • 2 Tb. Sage

  • 1/2 cup of boiling water

  • 2 Tb. salt

  • 1/2 cup of raw Apple Cider Vinegar

  • Put sage in a jar. Pour boiling water over sage. Cover and let steep about 15 minutes.

  • Strain into a fresh jar.

  • Mix in salt and vinegar.

  • Keep in refrigerator for up to 4 days.

Dosing:

Gargle 1 or 2 mouthfuls as needed for a hot, raw sore throat.

Please consult your medical provider for any other symptom that is severe or concerning. 

For a specific consultation on how to proceed this Cold and Flu season with a customized plan, book a free consultation today.
 

Book your consultation today!

47: Train Smarter Not Harder

Train Smarter.png

I would argue that the majority of people are training Harder and not Smarter.

Living in harmony is about having more of a wholistic mindful awareness about which activities are depleting vs. rejuvenating your body and mind. 

Enjoy this week's resources on How to start setting up your Smart Training Schedule.

❤️ Stephanie 🧠✨🤸‍♂️🌱

The Freedom to Live 5 things Friday 


Every Friday, 5 things of value from the integrative health sciences.
The best of the best functional medicine, educational resources, research, quotes, books, tips, advice etc. all from the key pillars of the integrative health system.

1. Identify Your Levels of Stress

In order to rejuvenate your body, you must take in more energy than you give out for a period of time.

2.png


Develop a sense of awareness around how much energy you are giving out vs. taking in.

Evaluate your current level of stress with the Holmes-Rahe Stress Test below before you start designing your ideal Training Schedule.

What is your score?

The Holmes-Rahe Stress Scale.png
Stress.png

2. What to Eat on the Smart Training Schedule?

4.png

Low calorie long term diets place more added stress on the body, so we aim for a maintenance plan of 3 whole food meals/day.

Let's be mindful of all the factors that are putting stress on our adrenals below:

3. Sleep and Recovery Tracking

Tracking the physical signs of stress is so important to see how your body is adapting. 

How fast you recovery IS the Main GOAL within the Smart Training Schedule.  It's about building the body up instead of breaking it down.  

Clinical Signs of Stress

  • High resting HR/BPM (70+)

  • High BP (130/85+)

  • Low body temperature (<98 ̊)

  • Flu-like symptoms after exercise or stressful event

  • Erratic HRV

  • Dilated/Pinpoint Pupils

Functional Medicine Lab Testing Markers

  • High/Low cortisol/thyroid

  • High/Low electrolytes

  • High/Low blood sugar

  • High CRP, homocysteine, LDH, potassium on blood work

  • Gut permeability & digestive issues


See my previous episode #41 here on how to build your home Doctor's office.

Sleep and Recovery tracking with the OuraRing has been my simple solution over the last 6 months. 
Each morning I wake up with a "readiness score" that is taking into consideration how much sleep, REM, DEEP sleep, bed timing, restfulness, night time body temperature, heart rate,  and heart rate variability.  It monitors how long it takes for my heart rate to stabilize at night which is a major indicator of recovery. 

Honestly, it's been a game-changer.

See more here on HRV tracking tools, such as the Elite HRV here. (episode #26)

4.  Balance Yin vs. Yang Mind and Body Activities

Which activities give you more energy (Yin) vs. deplete your energy (Yang).

Review your Holmes-Rahe Stress Test score and Assess your YIN:YANG ratio of current activities in a Day, in a week.

Yin (depleting) SNS activities

Hard, Long, Intense Workouts
Waking up to an alarm, Disturbed Sleep, Less than 7hours of sleep
Bright flashing lights, loud noise, crowds
Stuck in traffic, Running late
Getting kids ready
Arguments (work/relationships)
Gut problems,Viruses & infections
Planning social events
Anything causes pain (mind or body)

Yang (rejuvenation) PNS activities

Meditation
Walking Meditation
Binaural beats
Infrared Sauna
Gentle/medium pressure massage
Dry Brushing
Acupuncture
Playing with Children
Walking the dog
Hatha and Restorative Yoga
Hiking
Reading
Float tank
Listening to podcasts and taking notes

5.  Design your Smart Training Schedule

5.png

Foundations to a Successful SMARTER Training Schedule

  • Reduce caffeine (wean off)

  • Top Stress reducing supplements: B Vitamins, Magnesium, Melatonin, and Adaptogens

  • Make to-do list the night before

  • Ideally asleep before 10:30 PM

  • Plan fun activities and buffer times in your week

  • Exercise at least every other day

  • Walk 10,000 steps a day outside

  • Meditate (even just 5-minutes a day upon waking and/or before bed)

  • Take a full-day off from work every week (Sunday)
     

This ideal workout week schedule (Advanced)

For those that are looking to maximize their time and exercise routine to balance all aspects of training.

Methods of Exercise

Walking Days = 7 (10,000 steps total per day)
Resistance Training Days = 3
Cardio Days = 2
Formal Yoga or Stretching Class = 2

Sample Weekly Schedule
Monday: Resistance training workout #1 
Tuesday: Cardio workout #1 (bike, run, row, sprint, etc.)

Wednesday: Resistance training workout #2 
Thursday: Gentle Yoga, Qi Gong, Tai Chi, Stretching Class, or Rest
 (Infra Red, Float Tank, Foam Rolling)
Friday: Resistance training workout #3
Saturday: Cardio workout #2 (bike, run, row, sprint, etc.)

Sunday: Gentle Yoga, Qi Gong, Tai Chi, Stretching Class or Rest
 

This is my IDEAL Everyday athlete perfect world training week that balances soft and hard forms of movement and is perfect for almost anyone that is not competing for a specific goal (bodybuilding, powerlifting, sport specific).


Remember, it’s something to strive for even if you can only do half of what’s listed!”

I hope you enjoyed this week's newsletter/blog and don't forget to check out our brand new podcast version of the Freedom 5 weekly.

Happy Smart Training Scheduling!

Stephanie


If you would like support over the next month, 3 months, 6 months, contact us today to get started on a personalized plan to rebalance your health. 
 

Book your complementary consultation today.