Fermentation is the ONLY food preservation technique that progressively improves the nutritional value of your food making it healthier for you as it ages.
It’s also really HARD to MESS it UP and there’s a TON of room for creativity while following some basic principles.
Unlike other food preservation techniques, freezing, drying, and canning, with each of these processes, we are loosing some of the nutritional value.
Unlike Canning which is an unnatural and industrialized way of preserving foods within the last 200 years; Fermenting is a many thousand-year-old process done for centuries that allows the natural bacteria present in food, in air, and on your kitchen surfaces to proliferate to allow these very bacteria to preserve the food.
In this modern industrial age, we've really become so disconnected with our food and we've even become almost afraid of it. Bacteria is our friend and not our enemy. In both the conventional and holistic space, we are often being taught to kill and fear bacteria. It's all about a healthy level of balanced bacteria that mimics nature. When we annihilate and wipe out all the bacteria unnaturally, that scenario is when we typically see an imbalance of the bad to good ratio.
Fermenting vegetables is very, very safe. There is no hidden dangers involved. If something goes wrong with your ferment, you are going know immediately when you open that jar or open that crock up, because it's going to smell so bad.
Unlike pressure-canning low-acid foods where it’s more important to follow tried and tested recipes to a T, you can put away your cookbooks and make up your own recipes and they're going to be completely safe and amazing.
KEY PRINCIPLES
1. Choose raw, fresh, and organic vegetables
If your vegetables have been sprayed by fungicides, pesticides, or herbicides, you're very likely to kill off the good bacteria that you want to grow, and you'll end up with rotten food rather than fermented food.

2. Water
Likewise if you are using unfiltered tap water containing chlorine, fluoride, pesticides, and chemical fertilizers etc. this is counterproductive and will kill off the good bacteria.
3. Salt Brine
Do not use iodized salt or table salt, as both of those things contain


chemicals that can harm your ferment. You can use a 100%-pure sea salt, Himalayan salt, a Celtic salt, Redmond Real Salt etc.
Getting Started
The easiest way to eat a ferment is just as a cold side dish all by itself, but there are so many other options. Of course, to retain most of its healthy properties you will want to eat it raw and not heated above about 105°F. But that doesn’t mean that you CAN’T cook it.
It is suggested that one should eat 1⁄4 cup of raw fermented food per meal for optimal health. You can do this by eating a ferment plain or by adding it to warmed food right before serving. Adding fermented veggies to a bowl of rice and chicken makes an amazing, simple meal.
Making A Brined Ferment
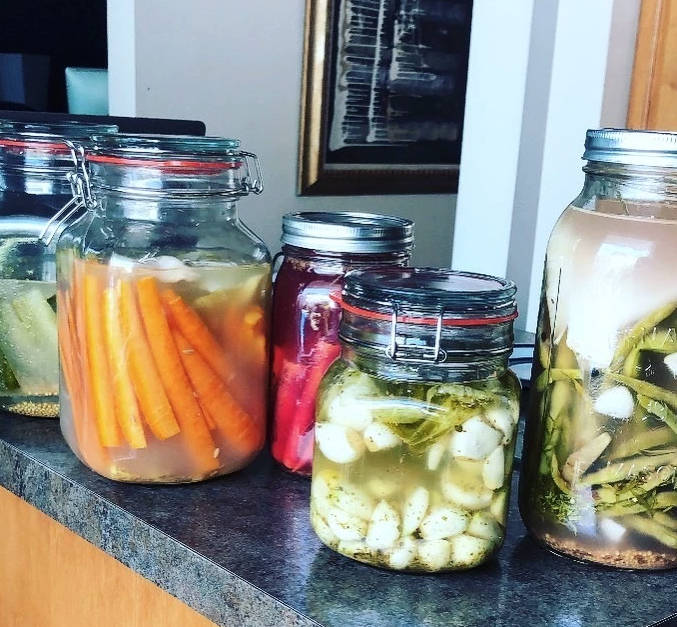
Cucumbers, Carrots, Garlic, String Beans, Beets, Red Onions, Bell Peppers, Broccoli, Ginger Root, Fennel, Celery, Cabbage,
Any vegetables that are whole or chopped will need to be submerged in a brine. Making brine is very simple; it is just salt and water combined and stirred until the salt dissolves. A great thing about brine is that you can prepare a large amount at once and just save it in the refrigerator until it is needed. That makes chopped veggie ferments REALLY simple. Harvest the veggies, chop them, stick them in a jar, pour in the brine, submerge the veggies, and you are done! Now that’s my kind of food preservation.
Basic Brine (Chopped or whole veggies):
1 quart filtered/distilled non-chlorinated/fluoridated water
3 tablespoons fine grained salt (4.5 tablespoons if using coarse salt)
Mix together until salt has dissolved.
Add 1/4 cup of starter (either kombucha or left-over brine from a previous ferment). *** If you don’t have a starter then you can double the salt, but this will impact the flavour and most likely be too salty.
**** I recommend getting a bottle of kombucha and then going forward make sure to save your brines for future starter liquid :)
Each brine will have take on it’s own flavour so have fun with it!
Step 1:
Harvest veggies. You can grab all of one thing, craft a special selection of favourites, or just grab a little of everything that happens to be ripe that day.
Step 2:
Rinse produce to remove dust. Chop to roughly the same size, if desired.
Step 3:
Put veggies in vessel along with any seasoning you desire.
Step 4:
Pour starter and brine into the jar until all of the veggies are covered by at least 1” of brine.
Step 5:
Submerge veggies under the brine by using a cabbage leaf, a weighted plate, or a fermenting weight.
Step 6:
Leave on counter at room temperature for 3 days. Begin tasting and transfer to cold storage once the flavour suits you (and before it gets too sour). Once you like it, go ahead and put it in the refrigerator or in your cold storage.
Storing Fermented Foods
Fermented food really does not go bad as long as it stays under its brine.
It is important to remember about storing your ferments is that putting your ferments into cold storage does not stop the fermentation; it just slows it way down.
The closer to the level of freezing you get, the slower that fermentation is going to go. In other words, the colder you can get that without actually freezing it, the longer it's going to take for your food to really break down. The longer you allow the fermentation process, in warmer environments, the more sour your food will become which all means that the colder you keep it, the longer you'll be able to enjoy it.